
在工业数字化转型过程中,3D 可视化监控系统凭借直观、沉浸式的优势,成为车间管理的重要工具。本文将详细介绍如何使用 Three.js 构建一套生产线 3D 状态监控系统,实现设备状态展示、产能数据可视化、交互式操作等核心功能
一、项目背景与技术选型
1. 项目需求
3D 可视化展示生产线布局及设备状态 实时显示生产线运行参数(产能、产量、状态等) 支持多生产线切换查看 设备状态可视化(运行 / 维护 / 停机) 交互式操作(视角旋转)
2. 技术栈选型
3D 核心库:Three.js(Web 端 3D 图形渲染引擎)
辅助库:
GLTFLoader(3D 模型加载) OrbitControls(相机控制) CSS3DRenderer/CSS2DRenderer(3D/2D 标签渲染) UI 框架:Element UI(进度条、样式组件)
动画库:animate-number(数值动画)
样式预处理:SCSS(样式模块化管理)
二、核心功能实现
1. 3D 场景基础搭建
场景初始化是 Three.js 项目的基础,需要完成场景、相机、渲染器三大核心对象的创建。
init() {// 1. 创建场景this.scene = newTHREE.Scene();// 2. 创建网格模型(生产线底座)const geometry = newTHREE.BoxGeometry(640, 1, 70);const material = newTHREE.MeshLambertMaterial({color: 0xffffff,transparent: true,opacity: 1 });this.mesh = newTHREE.Mesh(geometry, material);this.mesh.position.set(0, -140, 0);this.scene.add(this.mesh);// 3. 光源设置(点光源+环境光)const pointLight = newTHREE.PointLight(0xffffff, 0.5); pointLight.position.set(0, 200, 300);this.scene.add(pointLight);const ambientLight = newTHREE.AmbientLight(0xffffff, 0.3);this.scene.add(ambientLight);// 4. 相机设置(正交相机,适合工业场景展示)const container = document.getElementById("container");const width = container.clientWidth;const height = container.clientHeight;const aspectRatio = width / height;const scale = 230; // 场景显示范围系数this.camera = newTHREE.OrthographicCamera( -scale * aspectRatio, scale * aspectRatio, scale, -scale,1,1000 );this.camera.position.set(-100, 100, 500);this.camera.lookAt(this.scene.position);// 5. 渲染器设置this.renderer = newTHREE.WebGLRenderer({antialias: true, // 抗锯齿preserveDrawingBuffer: true// 保留绘制缓存 });this.renderer.setSize(width, height);this.renderer.setClearColor(0xffffff, 0); // 透明背景 container.appendChild(this.renderer.domElement);// 6. 控制器设置(支持鼠标交互)this.controls = newOrbitControls(this.camera, this.renderer.domElement);this.controls.addEventListener("change", () => {this.renderer.render(this.scene, this.camera); });// 初始渲染this.renderer.render(this.scene, this.camera);}
2. 3D 模型加载与生产线构建
(1)外部模型加载
使用 GLTFLoader 加载生产线设备 3D 模型(glb 格式),并设置模型位置:
loadGltf() {const loader = newGLTFLoader(); loader.load("../model/cj.glb", (gltf) => { gltf.scene.position.set(16, -139, 140); // 调整模型位置适配场景this.scene.add(gltf.scene);this.renderer.render(this.scene, this.camera); });}
(2)生产线围墙构建
通过 BufferGeometry 自定义几何体,创建生产线边界围墙,并用纹理贴图美化:
addWall() {// 围墙顶点坐标const vertices = [-320, 35, 320, 35, 320, -35, -320, -35, -320, 35];const geometry = newTHREE.BufferGeometry();const posArr = [];const uvArr = [];const height = -40; // 围墙高度// 构建围墙三角面for (let i = 0; i < vertices.length - 2; i += 2) {// 两个三角形组成一个矩形面 posArr.push( vertices[i], vertices[i+1], -140, vertices[i+2], vertices[i+3], -140, vertices[i+2], vertices[i+3], height, vertices[i], vertices[i+1], -140, vertices[i+2], vertices[i+3], height, vertices[i], vertices[i+1], height );// UV贴图坐标 uvArr.push(0,0, 1,0, 1,1, 0,0, 1,1, 0,1); }// 设置几何体属性 geometry.attributes.position = newTHREE.BufferAttribute(newFloat32Array(posArr), 3); geometry.attributes.uv = newTHREE.BufferAttribute(newFloat32Array(uvArr), 2); geometry.computeVertexNormals(); // 计算法线// 加载纹理并创建材质this.texture = newTHREE.TextureLoader().load("../images/linearGradient.png");this.mesh = newTHREE.Mesh(geometry, newTHREE.MeshLambertMaterial({color: this.dict_color[this.progress.state],map: this.texture,transparent: true,side: THREE.DoubleSide, // 双面渲染depthTest: false }));this.mesh.rotation.x = -Math.PI * 0.5; // 旋转适配场景this.scene.add(this.mesh);}
4. 状态可视化与数据面板
(1)多状态颜色映射
定义生产线三种状态(运行中 / 维护中 / 停机中)的颜色映射,实现状态可视化:
dict_color: { 运行中: "#32e5ad", // 绿色 维护中: "#fb8d1c", // 橙色 停机中: "#e9473a"// 红色}
(2)数据面板设计
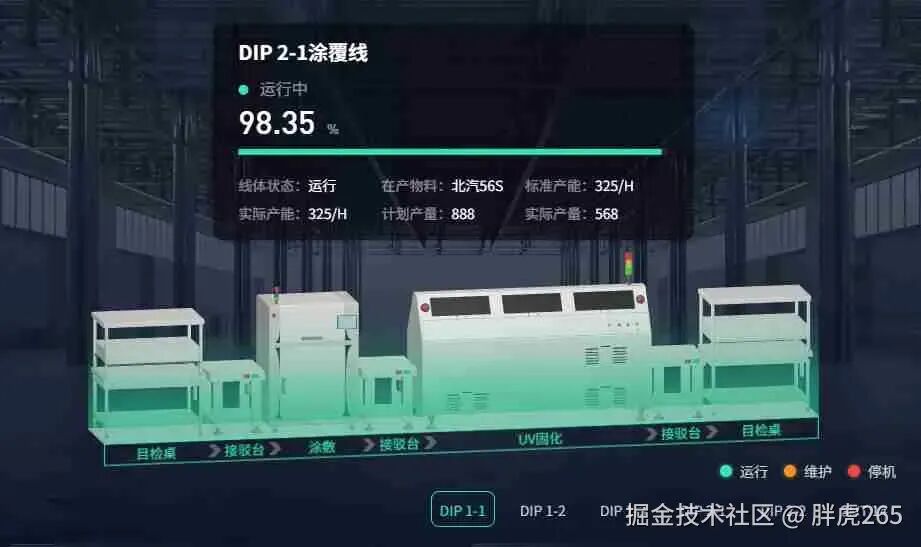
通过 CSS2DRenderer 将数据面板作为 2D 标签添加到 3D 场景中,实时展示生产线参数:
<divid="tooltip"><divclass="title">DIP 2-1涂覆线</div><divclass="progress"><pclass="state"><spanclass="icon":style="{ backgroundColor: dict_color[progress.state] }"></span> {{ progress.state }}</p><pclass="value"><animate-numberfrom="0":key="progress.value":to="progress.value"duration="2000"easing="easeOutQuad":formatter="formatter" ></animate-number> %</p><el-progress:percentage="progress.value":show-text="false":color="dict_color[progress.state]"></el-progress></div><ulclass="infoList"><liv-for="(item, index) in infoList":key="index"><label>{{ item.label }}:</label><span>{{ item.value }}</span></li></ul></div>
addTooltip() {const tooltipDom = document.getElementById("tooltip");const tooltipObject = newCSS2DObject(tooltipDom); tooltipObject.position.set(0, 120, 0); // 面板在3D场景中的位置this.scene.add(tooltipObject);this.labelRenderer2D.render(this.scene, this.camera);}
5. 多生产线切换功能
支持切换查看多条生产线状态,通过点击标签切换数据和状态颜色:changeType(index) {this.typeIndex = index;// 根据索引切换不同生产线的状态数据if (index % 3 === 0) {this.progress = this.progress1; // 运行中 } elseif (index % 3 === 1) {this.progress = this.progress2; // 维护中 } else {this.progress = this.progress3; // 停机中 }}// 监听progress变化,更新3D模型颜色watch: {progress: {handler() {this.mesh.material.color.set(this.dict_color[this.progress.state]);this.renderer.render(this.scene, this.camera); },deep: true }}
6. 响应式适配
处理窗口大小变化,确保 3D 场景自适应调整:
onWindowResize() {const container = document.getElementById("container");const width = container.clientWidth;const height = container.clientHeight;// 更新渲染器尺寸this.renderer.setSize(width, height);this.labelRenderer.setSize(width, height);this.labelRenderer2D.setSize(width, height);// 更新相机参数const aspectRatio = width / height;const scale = 230;this.camera.left = -scale * aspectRatio;this.camera.right = scale * aspectRatio;this.camera.top = scale;this.camera.bottom = -scale;this.camera.updateProjectionMatrix();// 重新渲染this.renderer.render(this.scene, this.camera);}
三、关键技术
1. 3D 与 2D 融合渲染
通过 CSS3DRenderer 和 CSS2DRenderer 实现 3D 场景与 2DUI 的无缝融合:
CSS2DRenderer:用于数据面板等需要始终面向相机的 2D 元素 CSS3DRenderer:用于生产线节点标签等需要 3D 空间定位的元素
2. 状态可视化设计
颜色编码:用不同颜色区分设备状态,符合工业监控的视觉习惯 动态更新:状态变化时实时更新 3D 模型颜色和数据面板 图标标识:通过图标和文字结合,增强状态辨识度
3. 性能优化
抗锯齿设置:提升 3D 模型显示清晰度 双面渲染:确保围墙等几何体正反面都能正常显示 纹理复用:减少重复纹理加载,提升性能 事件监听优化:仅在必要时重新渲染场景
作者:胖虎265链接:https://juejin.cn/post/7569413676156878863
